Rather than trying to change the page layout one at a time on every document you create, it is better to change the margins on the default template of your word processor. We will first show how to change the default template in LO Writer as well as creating Footer and Header Page Styles. We will then show a similar process in MS Word.
Create a Custom Default Template for Libre Writer
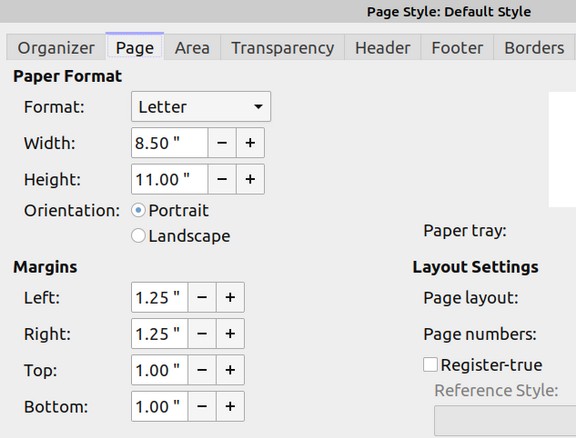
In Libre Writer, creating a custom default template is as easy as opening a new blank document, going to Format, Page in the top menu and increasing the margins from the initial settings of 0.70 inches all around to right and left margins of 1.25 and top and bottom margins of 1.00 inches (for an 8 ½ by 11 inch page):
Then click OK. Then click File, Templates, Save As Template.
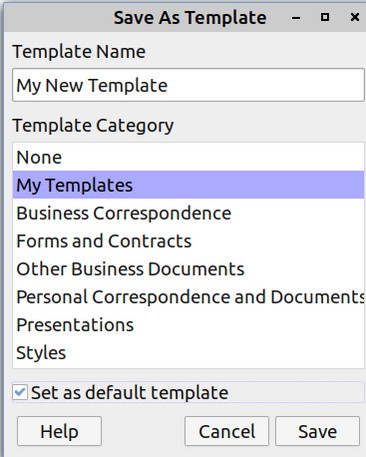
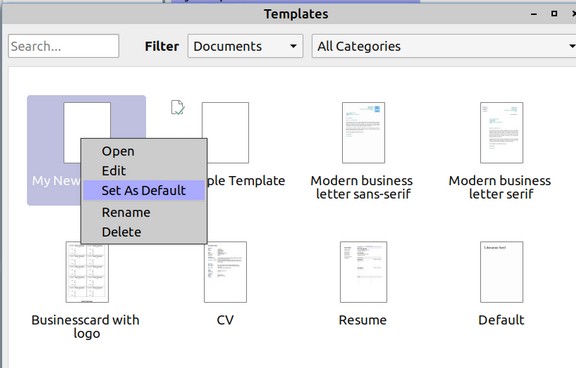
Give your custom template a name, place it in the My Templates folder and check the box to make it the default template. Then click Save. Then close the document. There is no need to save it. The next time you open a new Writer document, it will have the page margins you want. (note that you may have to click on File, Templates, Manage Template and then right click on the template to make it the default template).
How to Create a Custom Page Style in LO Writer
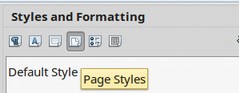
Now that we have created our default template, we are ready to create a few custom page styles. To create a custom page style, we need to open the Writer Styles Panel. There are several ways to open the Styles Panel. The most reliable way is in the top menu to click on Styles, Manage Styles. You can also click on View, Sidebar. Then click on the Folded Paper icon to open the Styles Panel. If you have added the Styles Icon to your Formatting Tool bar, you can also click on the Styles Folded Paper icon.
Any of these ways opens the Styles Panel to the right of your Writer document. The Panel is labeled Styles and Formatting. There will be six very small icons at the top of the panel. From left to right, these are Paragraph Styles, Character Styles, Frame Styles, Page Styles, List Styles and Table Styles.
Click on the Page Styles icon to bring up our default page styles.
Right click on the Default Page Style. Currently, there is only one page style called Default Style.
Page Style with Footer
We want to create a new page style based on the Default Page Style. So right click on the Default Page Style and click New. Call our new style Default Style with Footer.
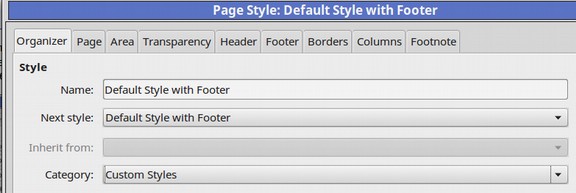
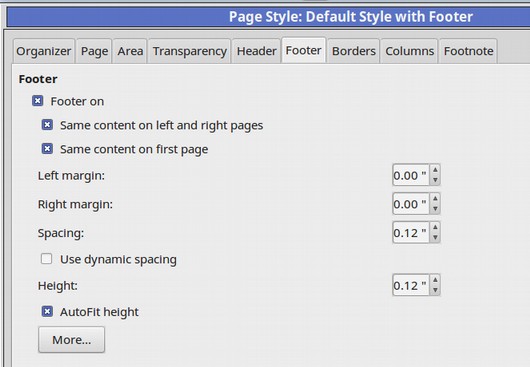
Click OK. Then open this style to edit it and make the next style the same – Default Style with Footer. Next click on the Footer tab and turn on the footer. By default, the Spacing and Height are set for 0.2 inches. Reduce both of these to 0.12 inches.
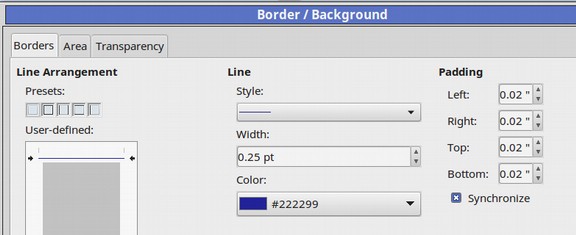
Then click on the More Button. In the User Defined Space, click on the top of the box to create a single line above the footer. Set the width for 0.25 pts and the color for Dark Blue # 222299. Then click OK and OK.
We will use this second page style whenever we want a document with a footer but not a header.
Page Style with Footer and Header
We now want to create a third custom page style called Default with Footer and Header. Click on the Default Page Style and click New. Use the Organizer tab to name the page style Default Style with Footer and Header. Repeat the above steps to add the footer. Then click on the Header Tab. By default, the Spacing and Height are set for 0.2 inches. Reduce both to 0.12. Then click the More button.
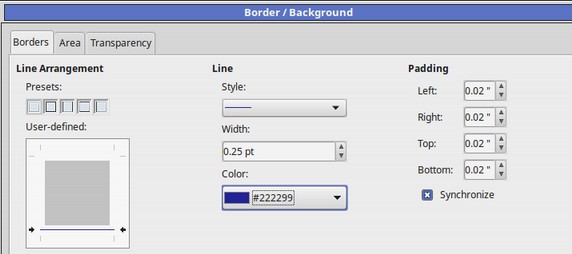
In the User Defined area, click on the bottom of the box to place a single line below the header. Set the width for 0.25 pt and change the color to Dark Blue #222299. Then click on the Area tab.
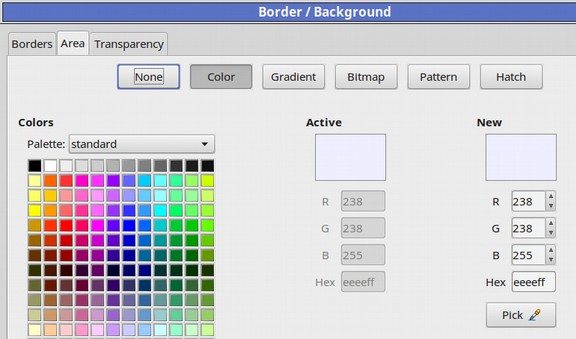
Change the background color to light blue #eeeeff. Then click OK.
How to Change the Default Template in MS Word
Now let’s see how to change the Page Margins in the MS Word default template. The process is different because Word does not allow you to change the default template from inside of MS Word. Instead, you need to use your file manager (aka Explorer).
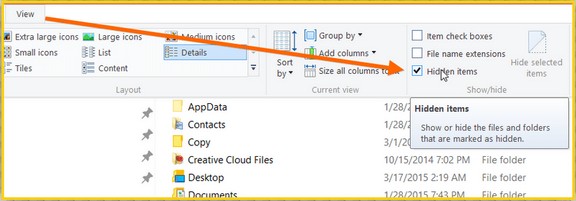
To change the default template, you need to click File, Open. Then go to your Windows file manager and click on This PC. Then click on C:\Users\user name. We then need to show the hidden folders in this folder. Click on View at the top of the screen and check the box called Hidden.
Then type the term AppData in the file manager search box.

Then click the blue arrow. Then open the most recent version of the AppData folder. Open the Roaming folder, then the Microsoft folder, then the Templates folder. You can also do a search for this folder.

In the templates folder, look for and open the Normal template (Normal. Dotm).
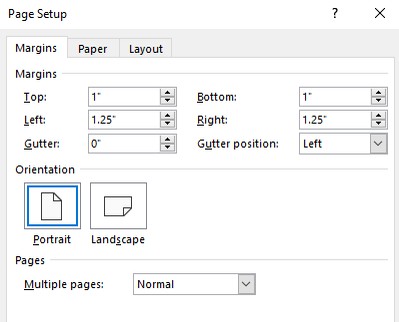
Click on Layout, Margins, Custom Margins. Normal is one inch all around. Then click on Custom Margins. Change Left and Right to 1.25 inches. As there is no header or footer on the default template, leave the top and bottom margins set for one inch.
Apply to whole document, click Set as Default.
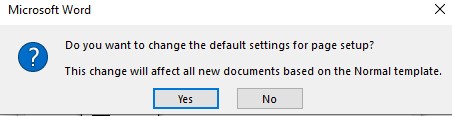
Click Yes and click OK. Then click File Save and File Close. Then restart Word and verify that the new document based on the normal template has page width margins of 1.25 inches by clicking on Layout Margins Custom Margins again.
Warning: If and when you upgrade, Word might generate a new Normal template file which will not include your customization. If this happens, you will need to repeat the above steps.
How to Create a Custom Page Style with a Footer in MS Word
Thankfully, it is easier to create custom page styles in MS Word than it is to modify the Word default template. Just open a new blank Word document. Type at the top of the document, Custom Page Style with Footer. Then click on Insert Footer. Then select the Blank Footer.

Where it says Type Here, type This is my sample footer. Then click Edit Footer. This will change the ribbon to the following:

Note that by default, the footer and header take up half an inch. Sadly, this will reduce your top and bottom margins by half an inch which is not what we want.

The solution is to move the spacing on the bottom footer to one inch above the bottom of the page. To center the footer, right click on the footer text and click Paragraph. Then click Alignment Center. To add Page numbers, type in the word Page and then click on Page Numbers, Current Position, Simple.

How to add a background color to an MS Word header or footer
It is a little harder in Word to add a background color to a header or footer. The “work around” is to add a shape to the header or footer and then assign a color to the shape and then place the shape behind the text. Here are the steps for adding a background color to the footer:
First make sure the footer is in the edit mode. Then click on Insert, Shape and select the rectangle. Drag the box across the entire area of the footer. It will look like this:

Then right click on the shape and fill it with whatever color you want. Then click on Wrap Text in the floating ribbon and click Behind Text.

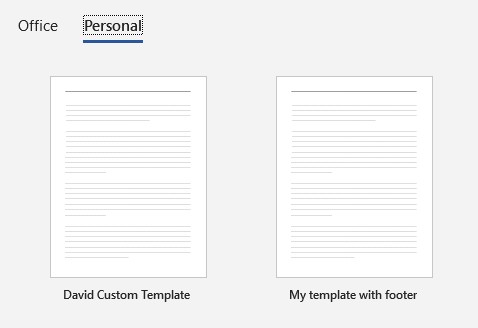
Now because MS Word does not really have Page Styles, we need to save this document as a template. Click File, Save As and then select Custom Office Templates.
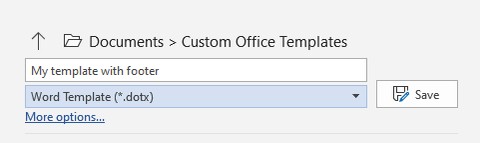
Call it My Template with Footer. Then for type, save it as a Word template. Then click Save. Then close the document. This new template is now under your Templates, More Templates, Personal folder.
As a homework assignment, use the template with a footer to create a template with a footer and a header.
How to Modify the Default Page Style in Google Docs
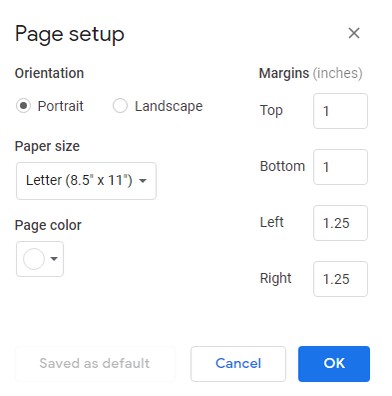
To change the default page margins for a new Google Doc, open a blank document then go to File, Page Set up.
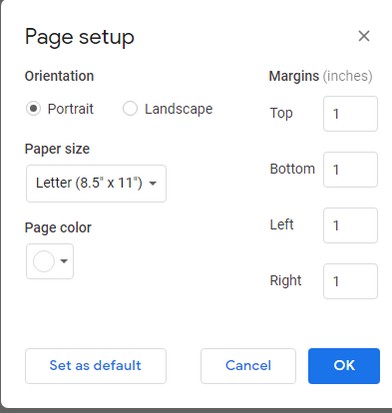
Change the left and right margins to 1.25. Then click Set as Default. Then click OK. Then close the document and open a new blank document.
Create a New Template with a Footer in Google Docs
Open a new blank document and click Insert Headers and Footers, Footer. Type in the space, This is my Google Docs Footer. Then hit the space bar a few times, then type Page and one more space. Then click Insert, Page Numbers, then choose the lower left option.

Then click Options Footer Format and change the margins from the footer to the bottom from the default of one half inch to one inch. Then click Apply. You can select the text, then change its color in the formatting toolbar. You can also align it to center. You can also set a highlight color behind the footer text.
How to change the background color of the footer or header in Google Docs
There is not an obvious way to change the background color of the header or the footer in Google Docs. What you can do as a work around is to copy your current footer into the clip board, then delete the footer you created above and insert a one row table into the footer. Then click Control plus V to move your footer into the table. Then right click on Table Properties.
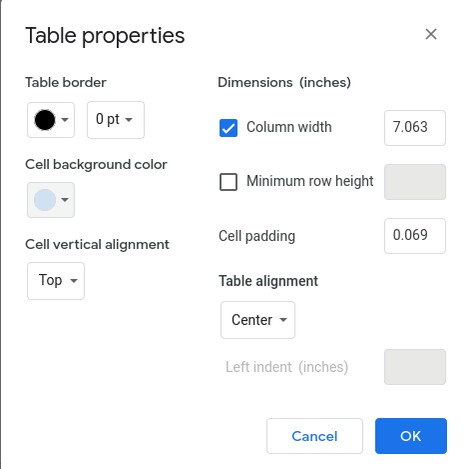
Change the Table Border to 0 and the cell background color to whatever you want. Set the cell width and padding and click OK.
Here is the result.

Because Google does not have page styles, we will save this as a new template. Type into the work space, This is my Google Docs Template with Footer. Then rename it. Then close the browser tab.
Should you create a new Google Docs template? Google has a templates page called the Template Gallery where you can submit your creations for the entire world to see and use. This page only works for paying customers and it does not work that well anyway.
We will therefore just create our own templates and save them as normal Google docs in our Google Drive file manager. We will leave making a Google Docs Template with Footer and Header as a homework assignment.
What’s Next?
Now that we have our custom page styles, we will define our paragraph styles.